Sharpness Scoring
Categories:
Sharpness Scoring
RawCull can automatically rank every image in a catalog by sharpness, so the sharpest frames rise to the top and out-of-focus or motion-blurred shots sink to the bottom. This page explains what the score means, how to run it, and how to interpret the results.
Overview
When you click Sharpness, RawCull analyses each RAW file using a multi-step pipeline:
- A small thumbnail is extracted directly from the ARW file — fast, no full RAW decode needed.
- Apple Vision locates the main subject in the frame (a bird in flight, an owl against a blurred background, etc.).
- A Gaussian pre-blur smooths the image to suppress high-ISO noise before edge detection.
- A Laplacian edge-detection kernel measures how much fine detail exists inside the subject area only — the background is ignored.
- The edge response is amplified, then passed through morphological erosion (to remove speckle noise) and dilation (to fill gaps and connect nearby edges).
- A robust tail score — the mean of values above the 95th percentile, clipped at the 99.5th — is used as the raw score, so a single sharp feather edge cannot carry a blurry frame.
- All scores are normalised against the sharpest frame in the catalog: that frame becomes 100, and every other frame is expressed as a percentage of it.
Because scores are relative to your catalog, a score of 60 does not mean the image is soft — it means it is 60 % as sharp as the best frame in that session. Opening a catalog of sharper images will recalibrate the scale.
Running a Sharpness Score
The Score Sharpness button appears in the grid toolbar. The toolbar function for showing the grid view is:
- show all thumbnails in a grid
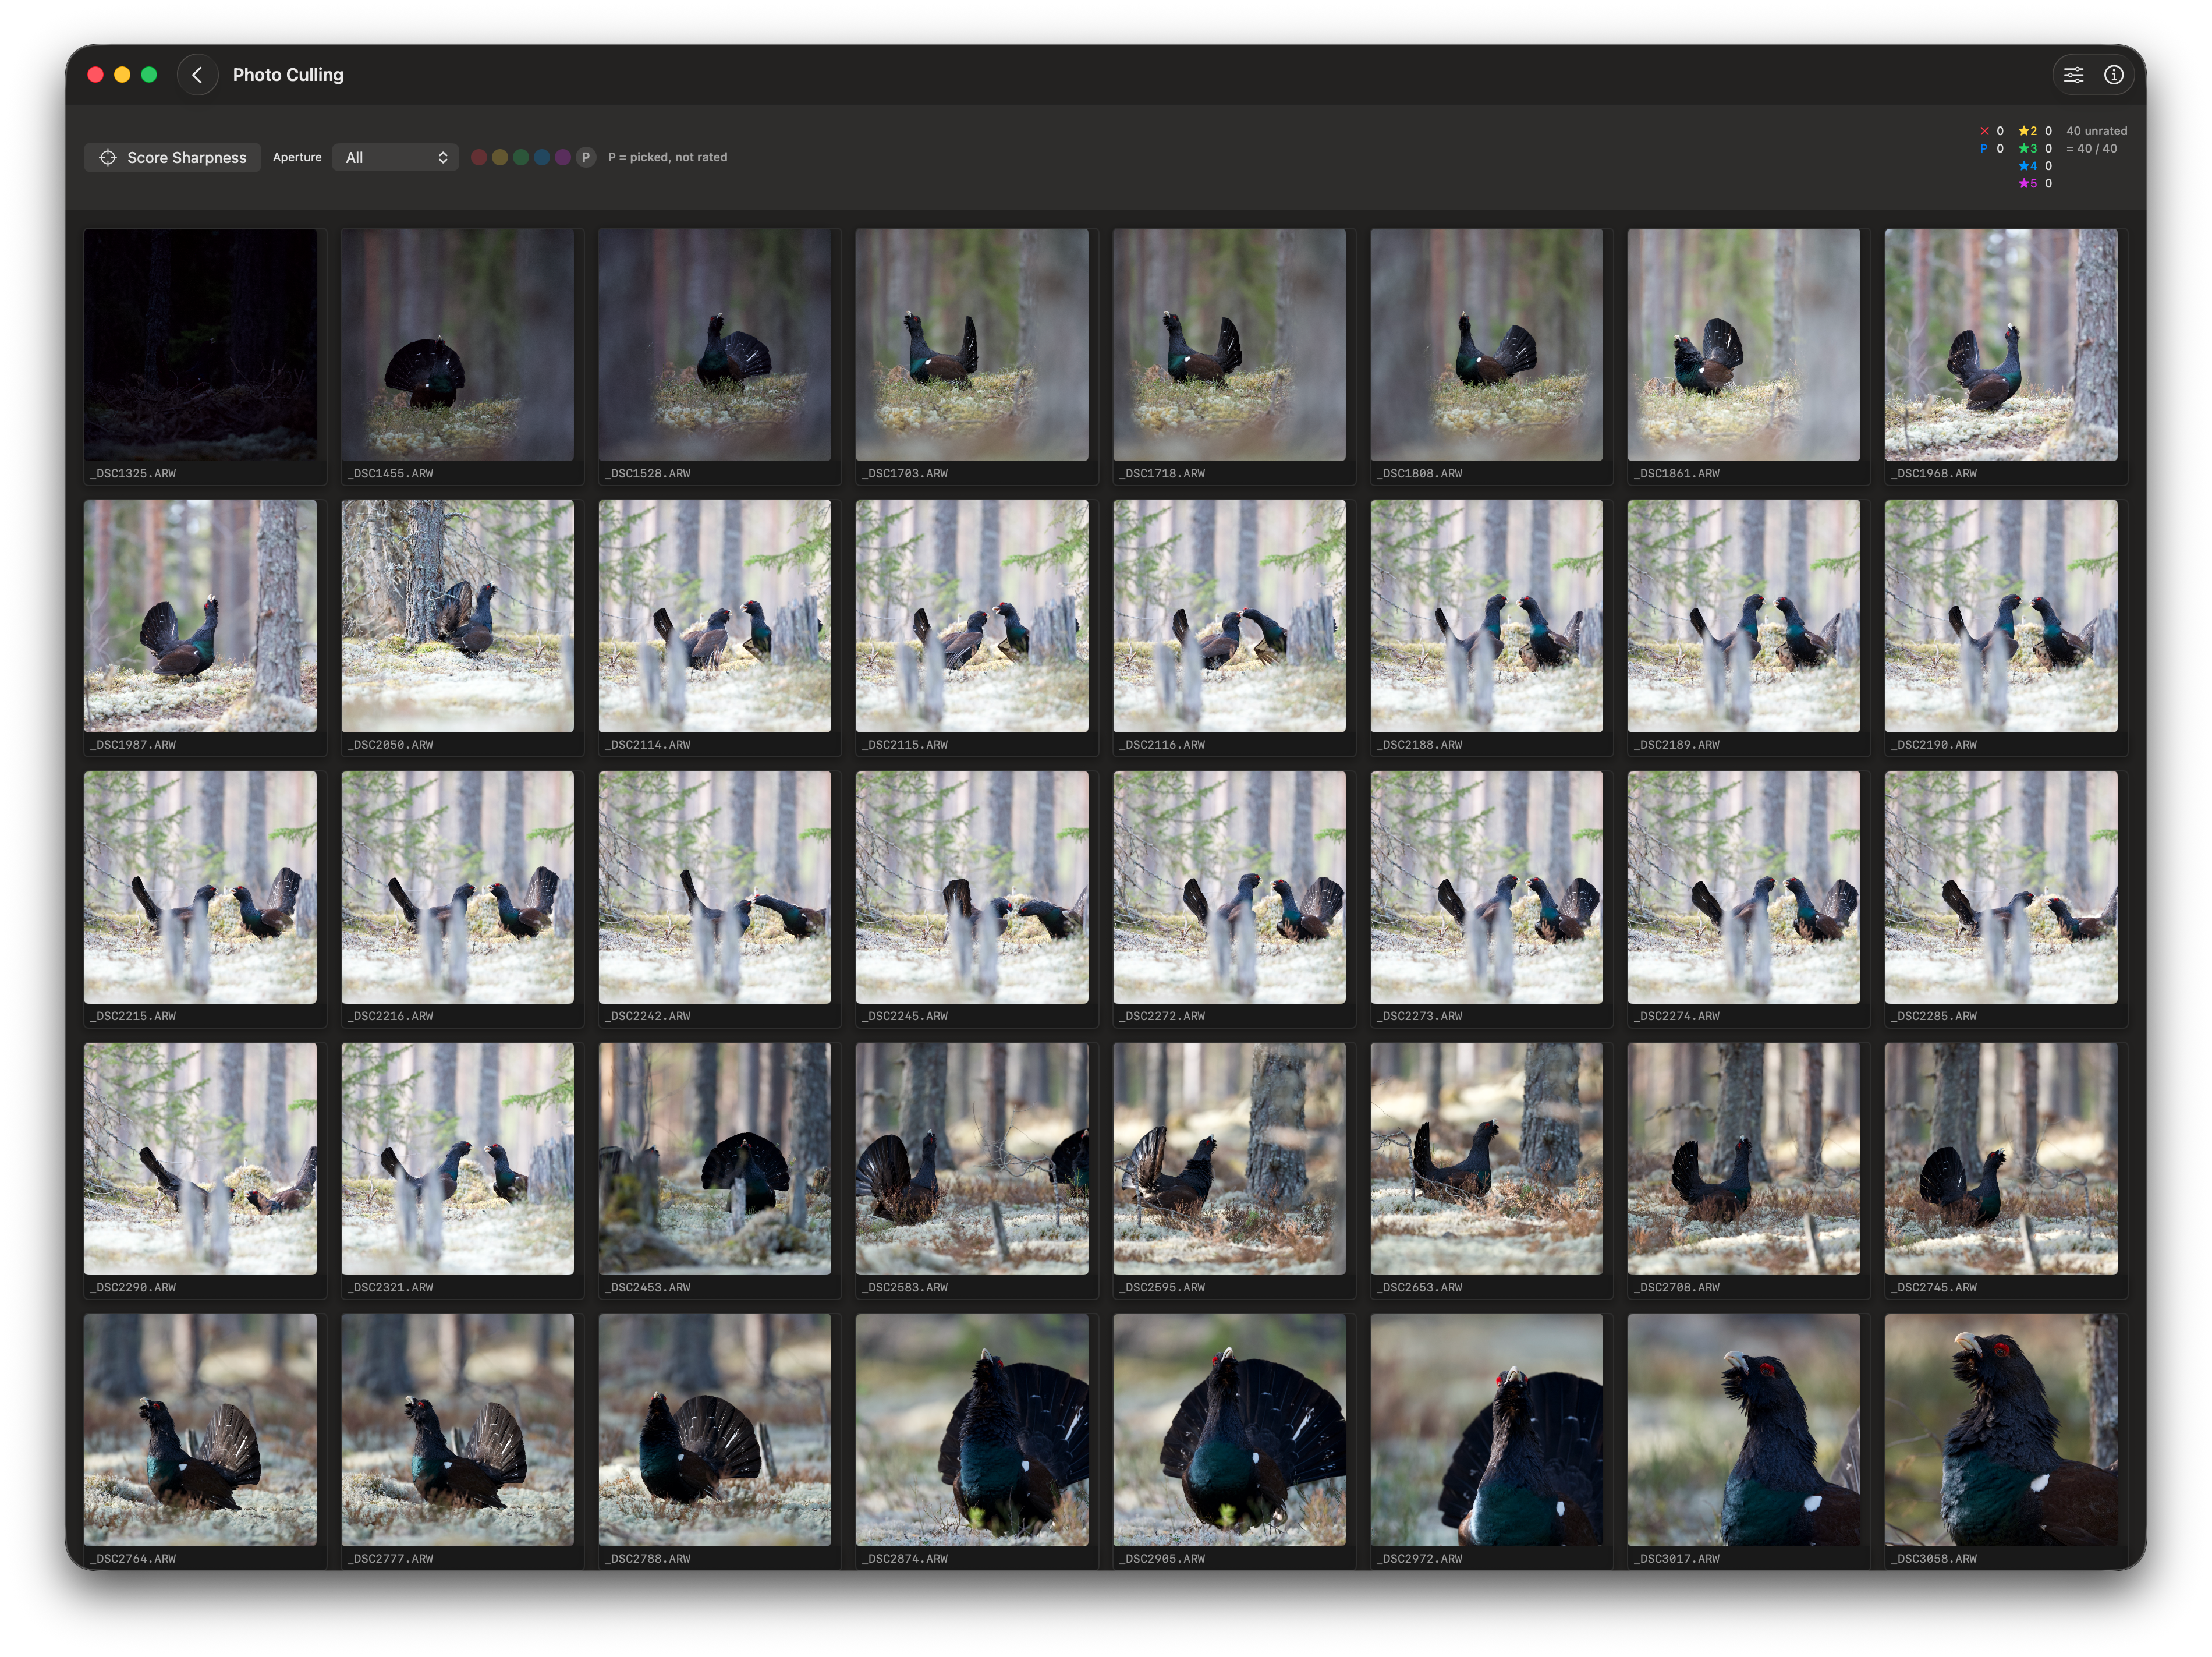
- Open a catalog and wait for thumbnails to finish generating.
- Click Score Sharpness (scope icon) in the toolbar above the grid.
- A Scoring… label replaces the button while analysis runs. Progress is bounded — at most six images are analysed concurrently to avoid saturating disk I/O.
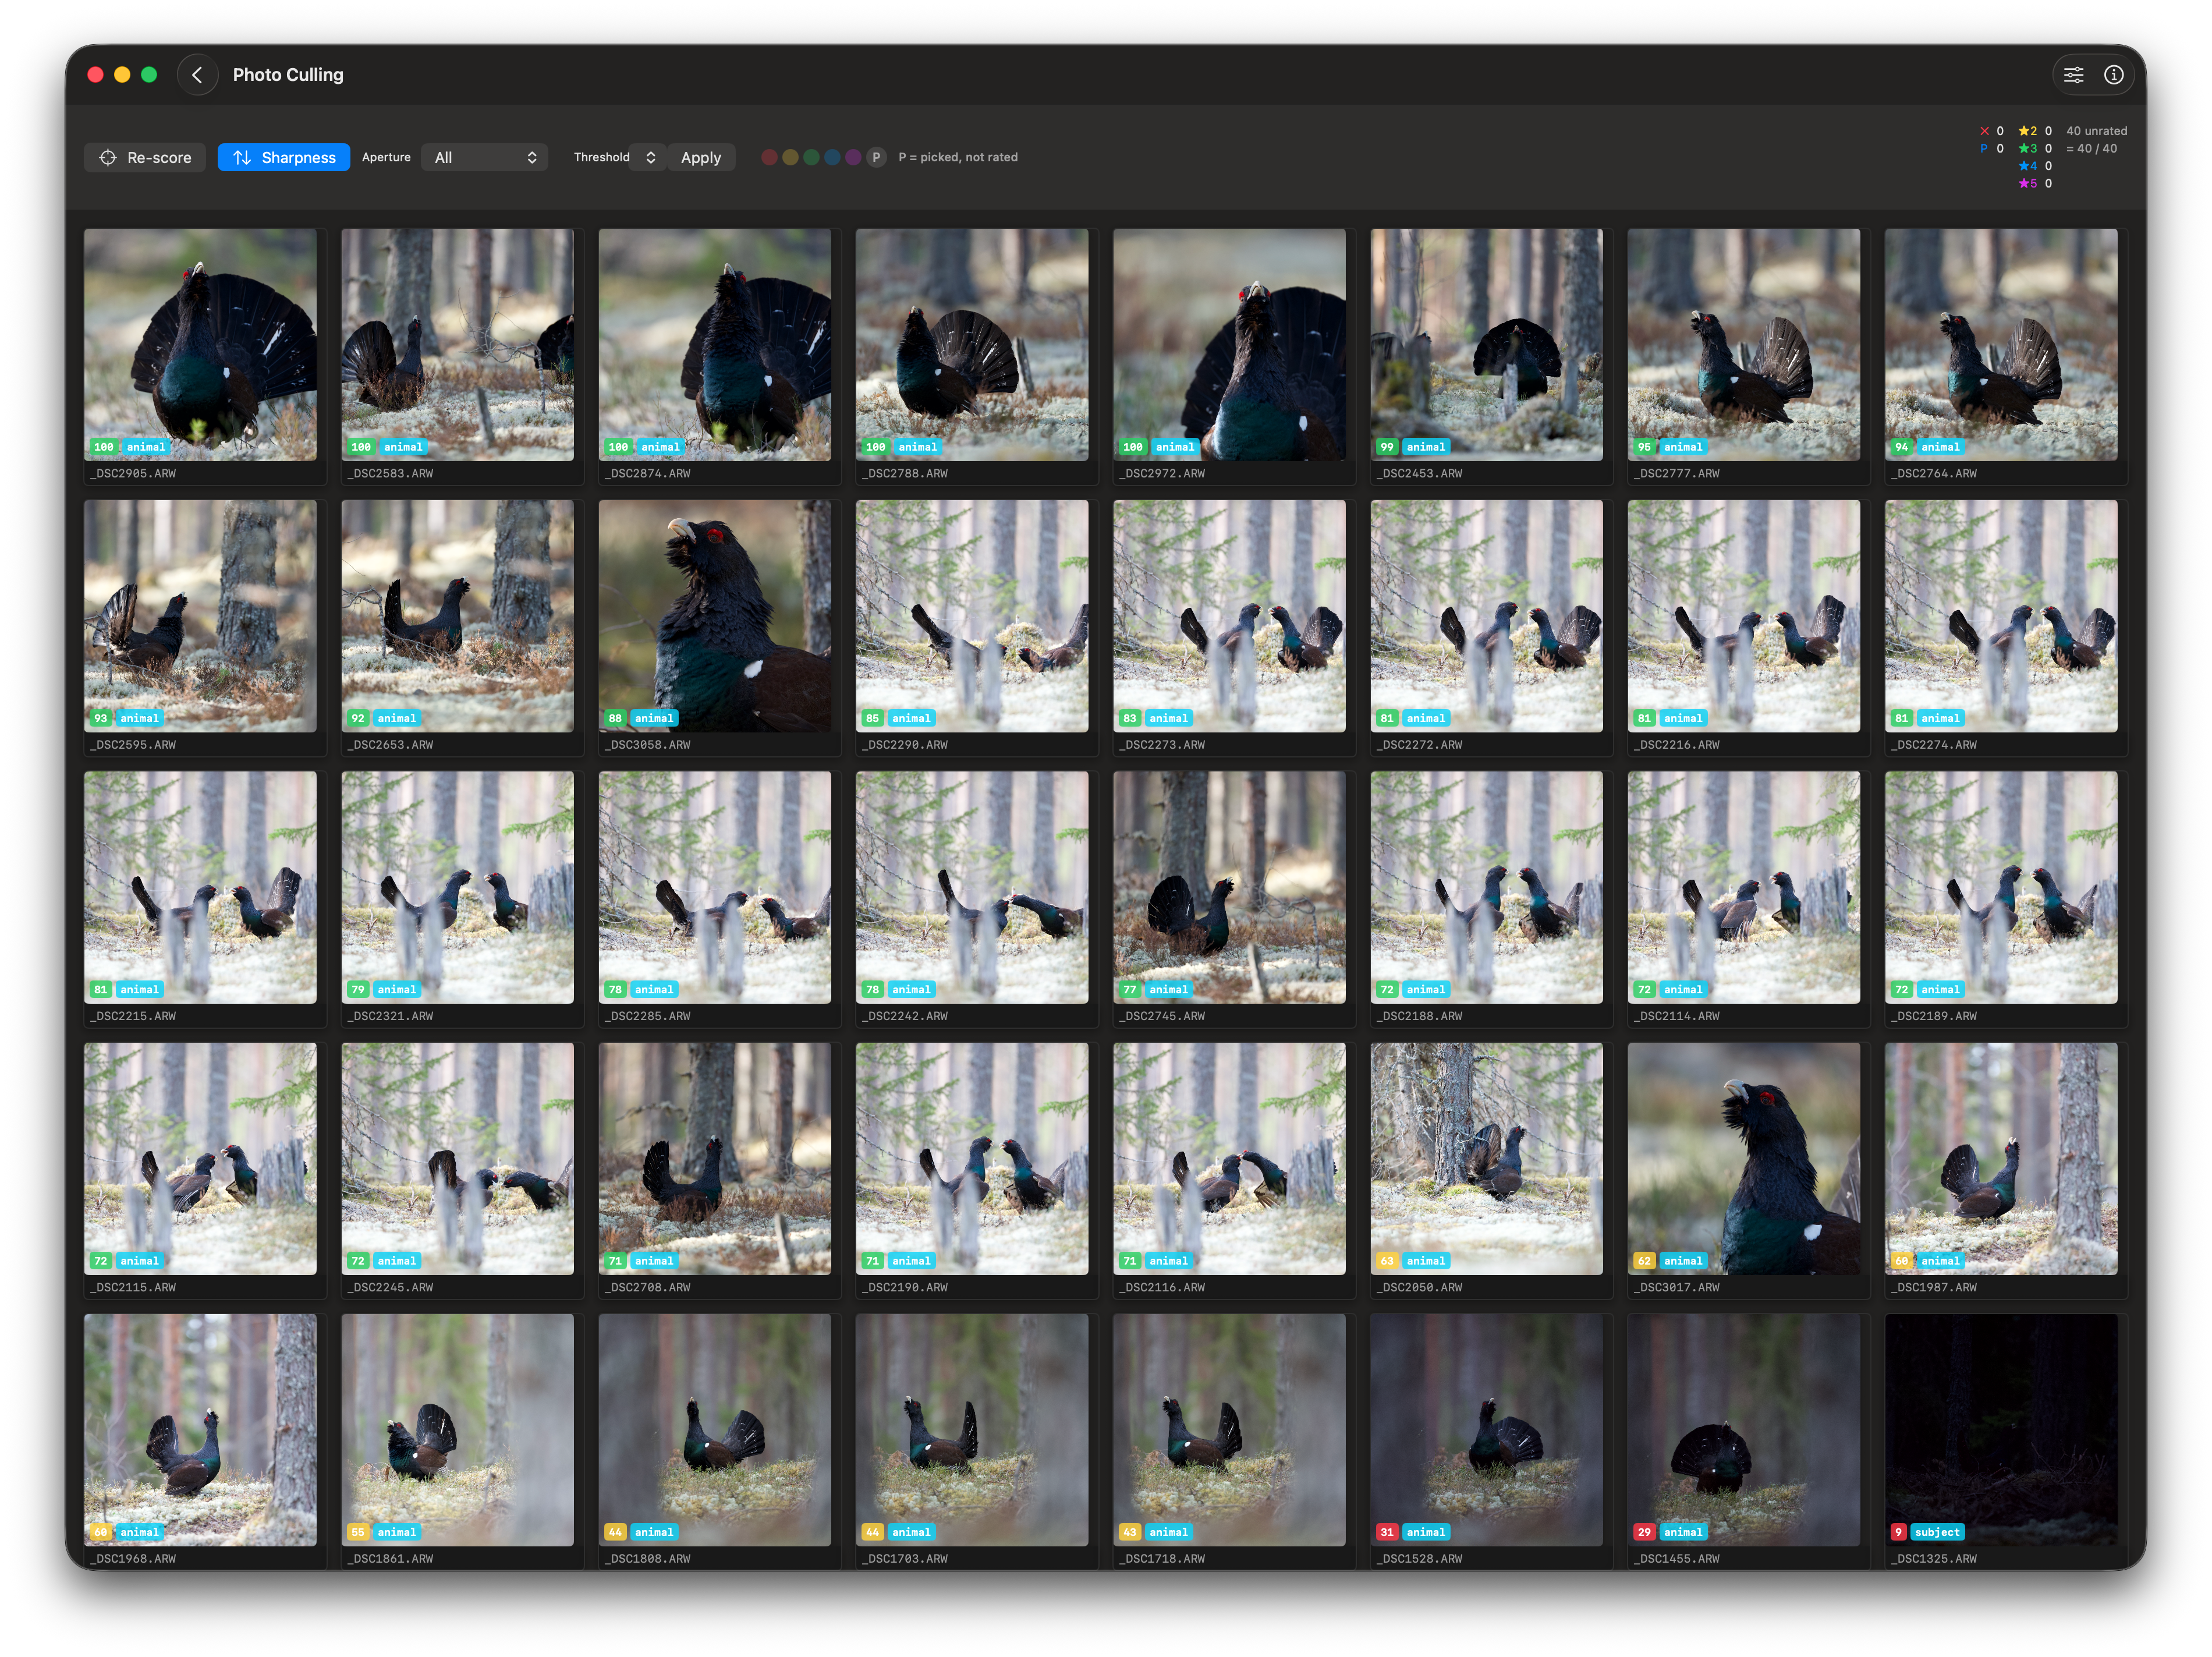
- When complete, a coloured score badge appears on every thumbnail and the grid re-sorts automatically with the sharpest frames first.
You can re-score at any time — for example, after adjusting the Focus Mask Controls or switching the aperture filter. Click Re-score (the button label changes once scores exist).
Reading the Score Badge
Score badges appear in the bottom-left corner of each thumbnail.
Each thumbnail shows a small badge in the bottom-left corner:
| Colour | Normalised score | Meaning |
|---|---|---|
| Green | 65 – 100 | Sharp — well-focused, fine detail visible |
| Yellow | 35 – 64 | Acceptable — slightly soft or minor motion blur |
| Red | 0 – 34 | Soft — missed focus, camera shake, or significant motion blur |
The number in the badge is the normalised score (0–100). The sharpest frame in the catalog always shows 100.
Sorting by Sharpness
The Sharpness sort toggle in the grid toolbar.
After scoring, the grid sorts sharpest-first automatically. You can toggle this off and back on with the Sharpness toggle button in the toolbar. Turning the toggle off returns the grid to its previous sort order (typically by filename).
The same toggle is also available in the sidebar toolbar for the vertical and horizontal list views.
Filtering by Aperture
The Aperture filter picker lets you focus on one shooting style at a time.
Wildlife and landscape sessions are often mixed in the same catalog but have very different sharpness expectations. The Aperture picker lets you restrict scoring and sorting to one shooting style:
| Filter | Aperture range | Typical use |
|---|---|---|
| All | All images | Default — no filtering |
| Wide (≤ f/5.6) | f/1.4 – f/5.6 | Birds, wildlife, portraits — subject isolation |
| Landscape (≥ f/8) | f/8 and above | Tripod landscape, architecture, macro — front-to-back sharpness |
Changing the aperture filter immediately re-filters the grid. If scores exist, the sharpness sort is re-applied within the filtered set.
Auto-Calibration from Burst
Instead of hand-tuning the Focus Mask Controls for each session, you can let RawCull calibrate Threshold and Laplacian strength automatically from the images in the current catalog. Calibration runs automatically when you click Score Sharpness.
Only these two values are written back by calibration — Pre-blur, Erosion radius, and Dilation radius are not touched and keep whatever values they had before.
How it works:
- Each image is decoded to a fast thumbnail and scored with the Laplacian amplifier disabled (gain = 1), so the result reflects the raw optical sharpness of that session without any prior tuning bias.
- Apple Vision locates the salient subject in each frame and collects scores from that region.
- Percentiles (p50, p90, p95, p99) are computed across all scoreable images in the catalog.
- Laplacian strength is set so that the catalog’s p95 score maps to 0.85 after amplification — giving the sharpest typical frames a strong, clear signal.
- Threshold is set to the 90th-percentile raw score multiplied by the tuned gain, placing the mask cutoff just above typical background noise for this session.
The calibrated values are applied immediately to the Focus Mask Controls sliders and remain active for the current catalog. Calibration requires at least 5 scoreable images; if fewer are available the existing config is left unchanged. You can still adjust any slider manually after calibration to fine-tune further.
The Focus Mask Overlay
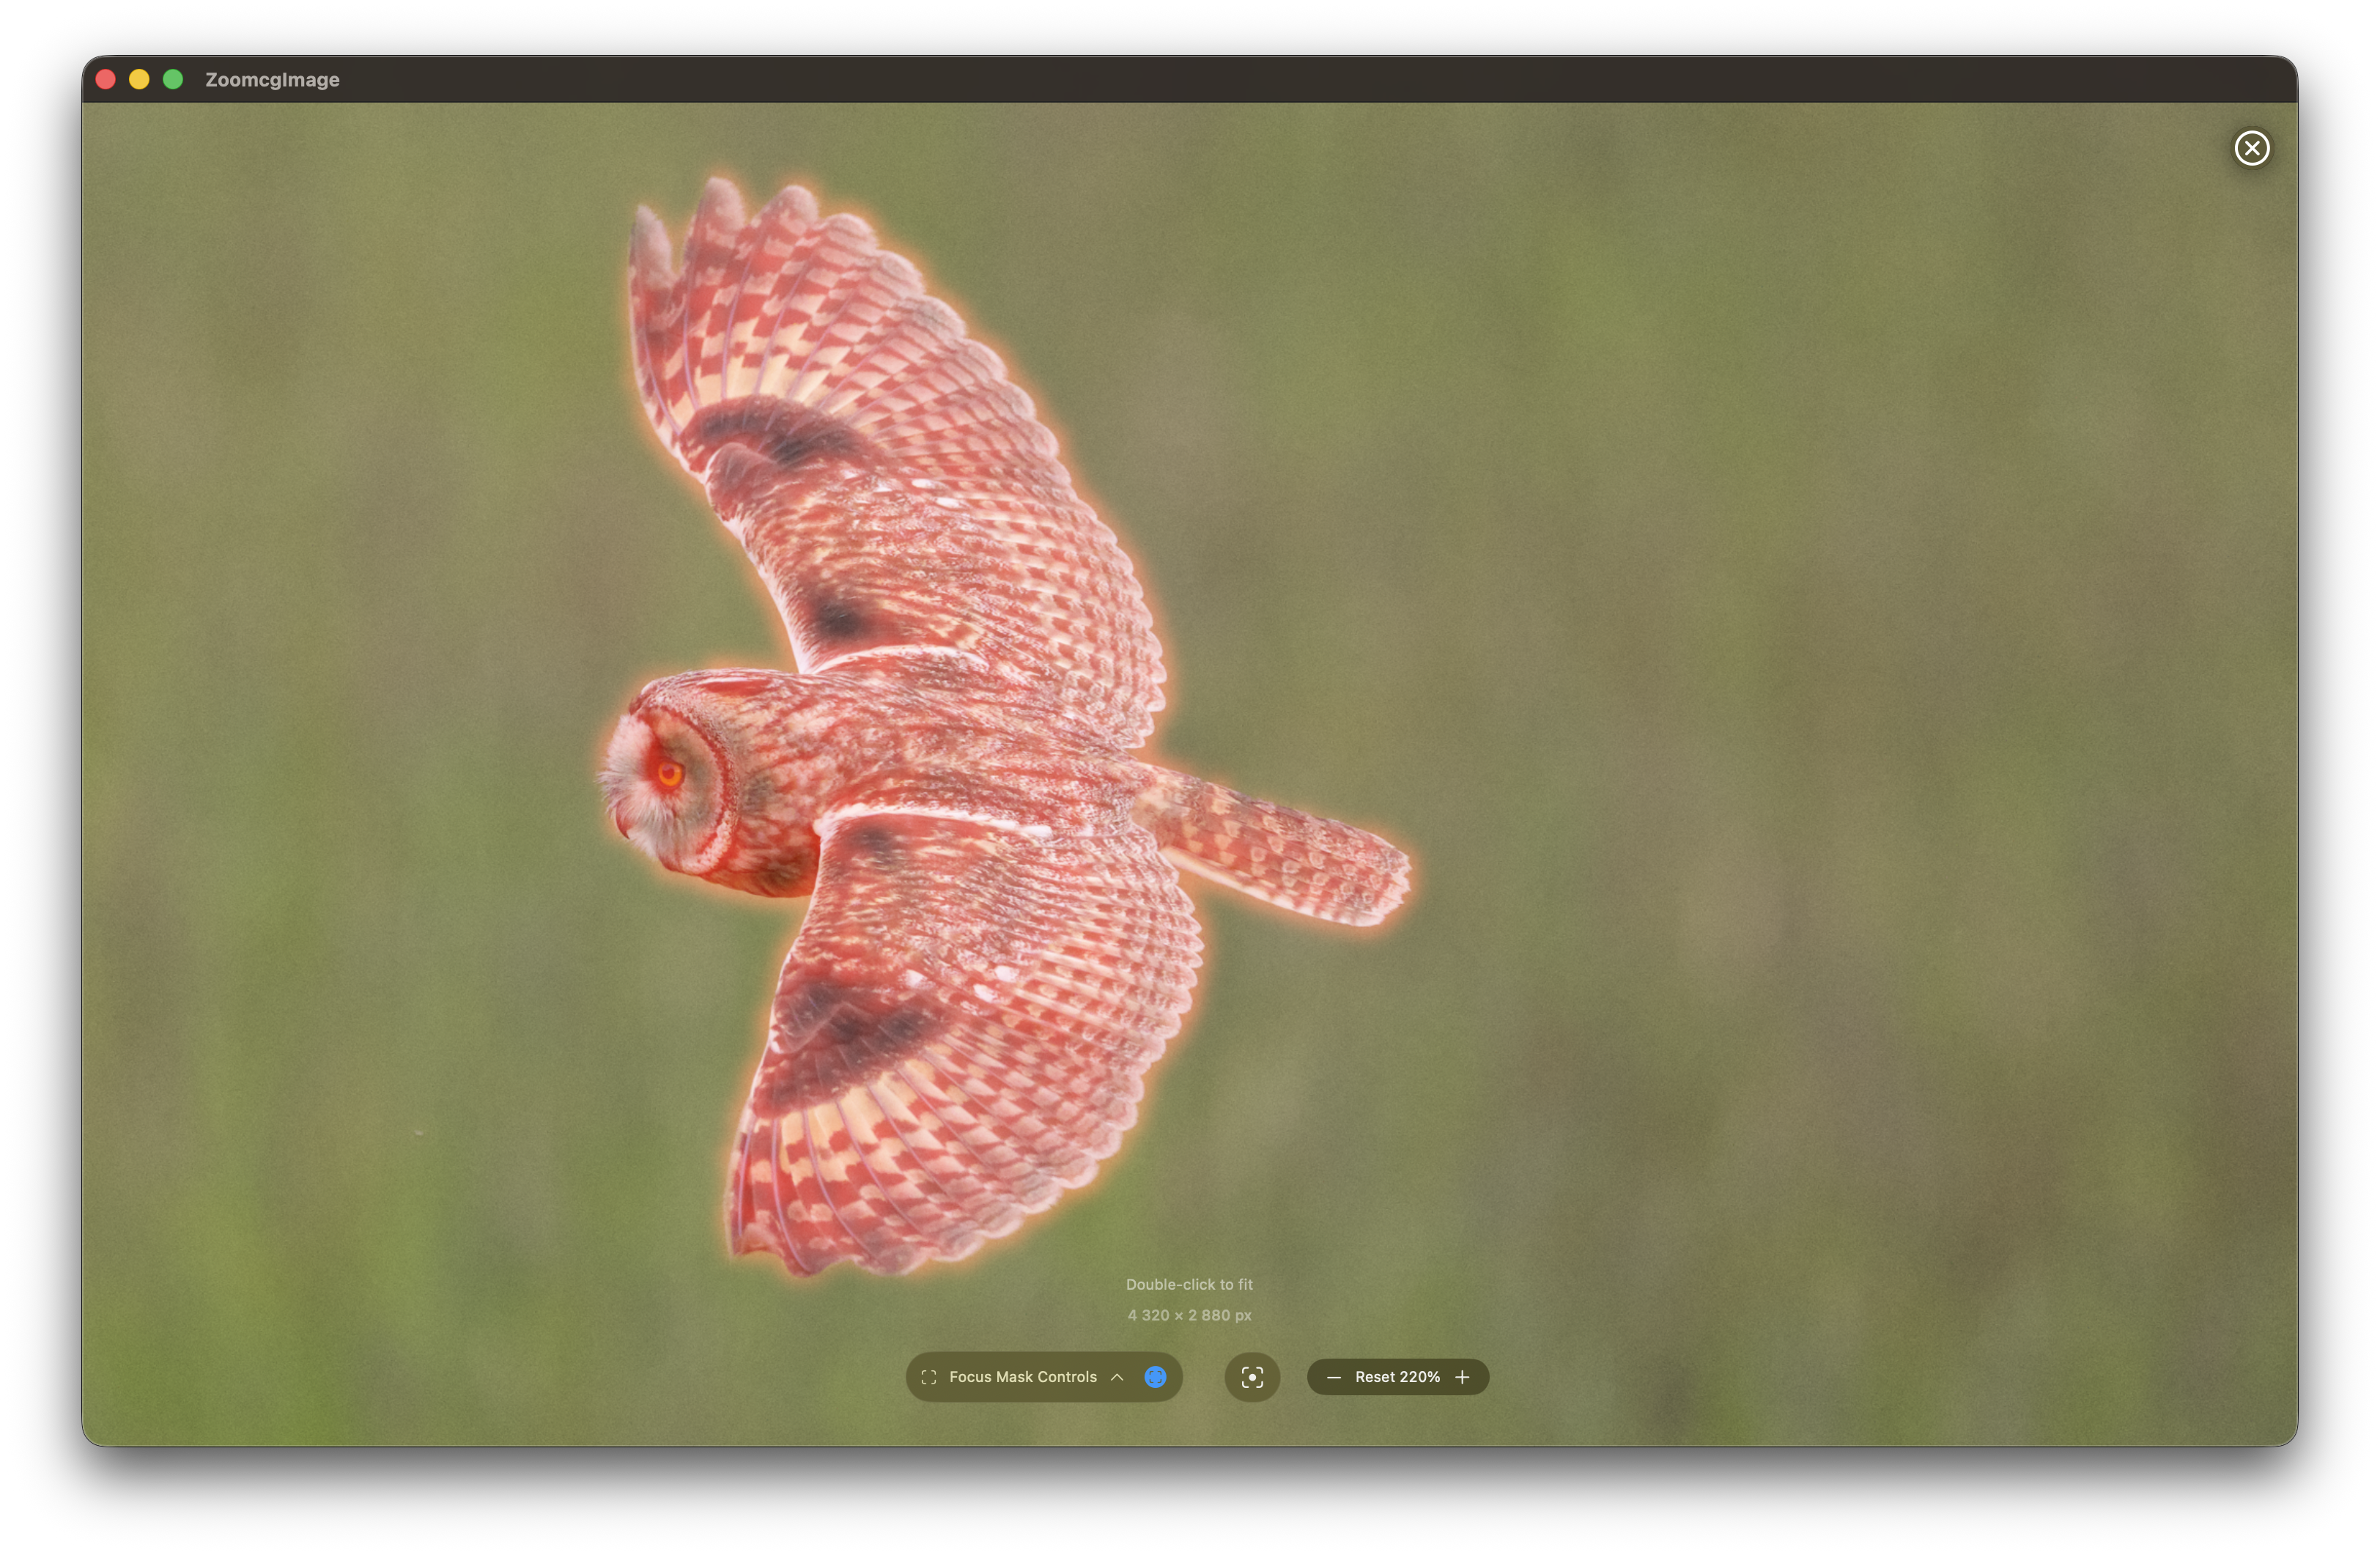
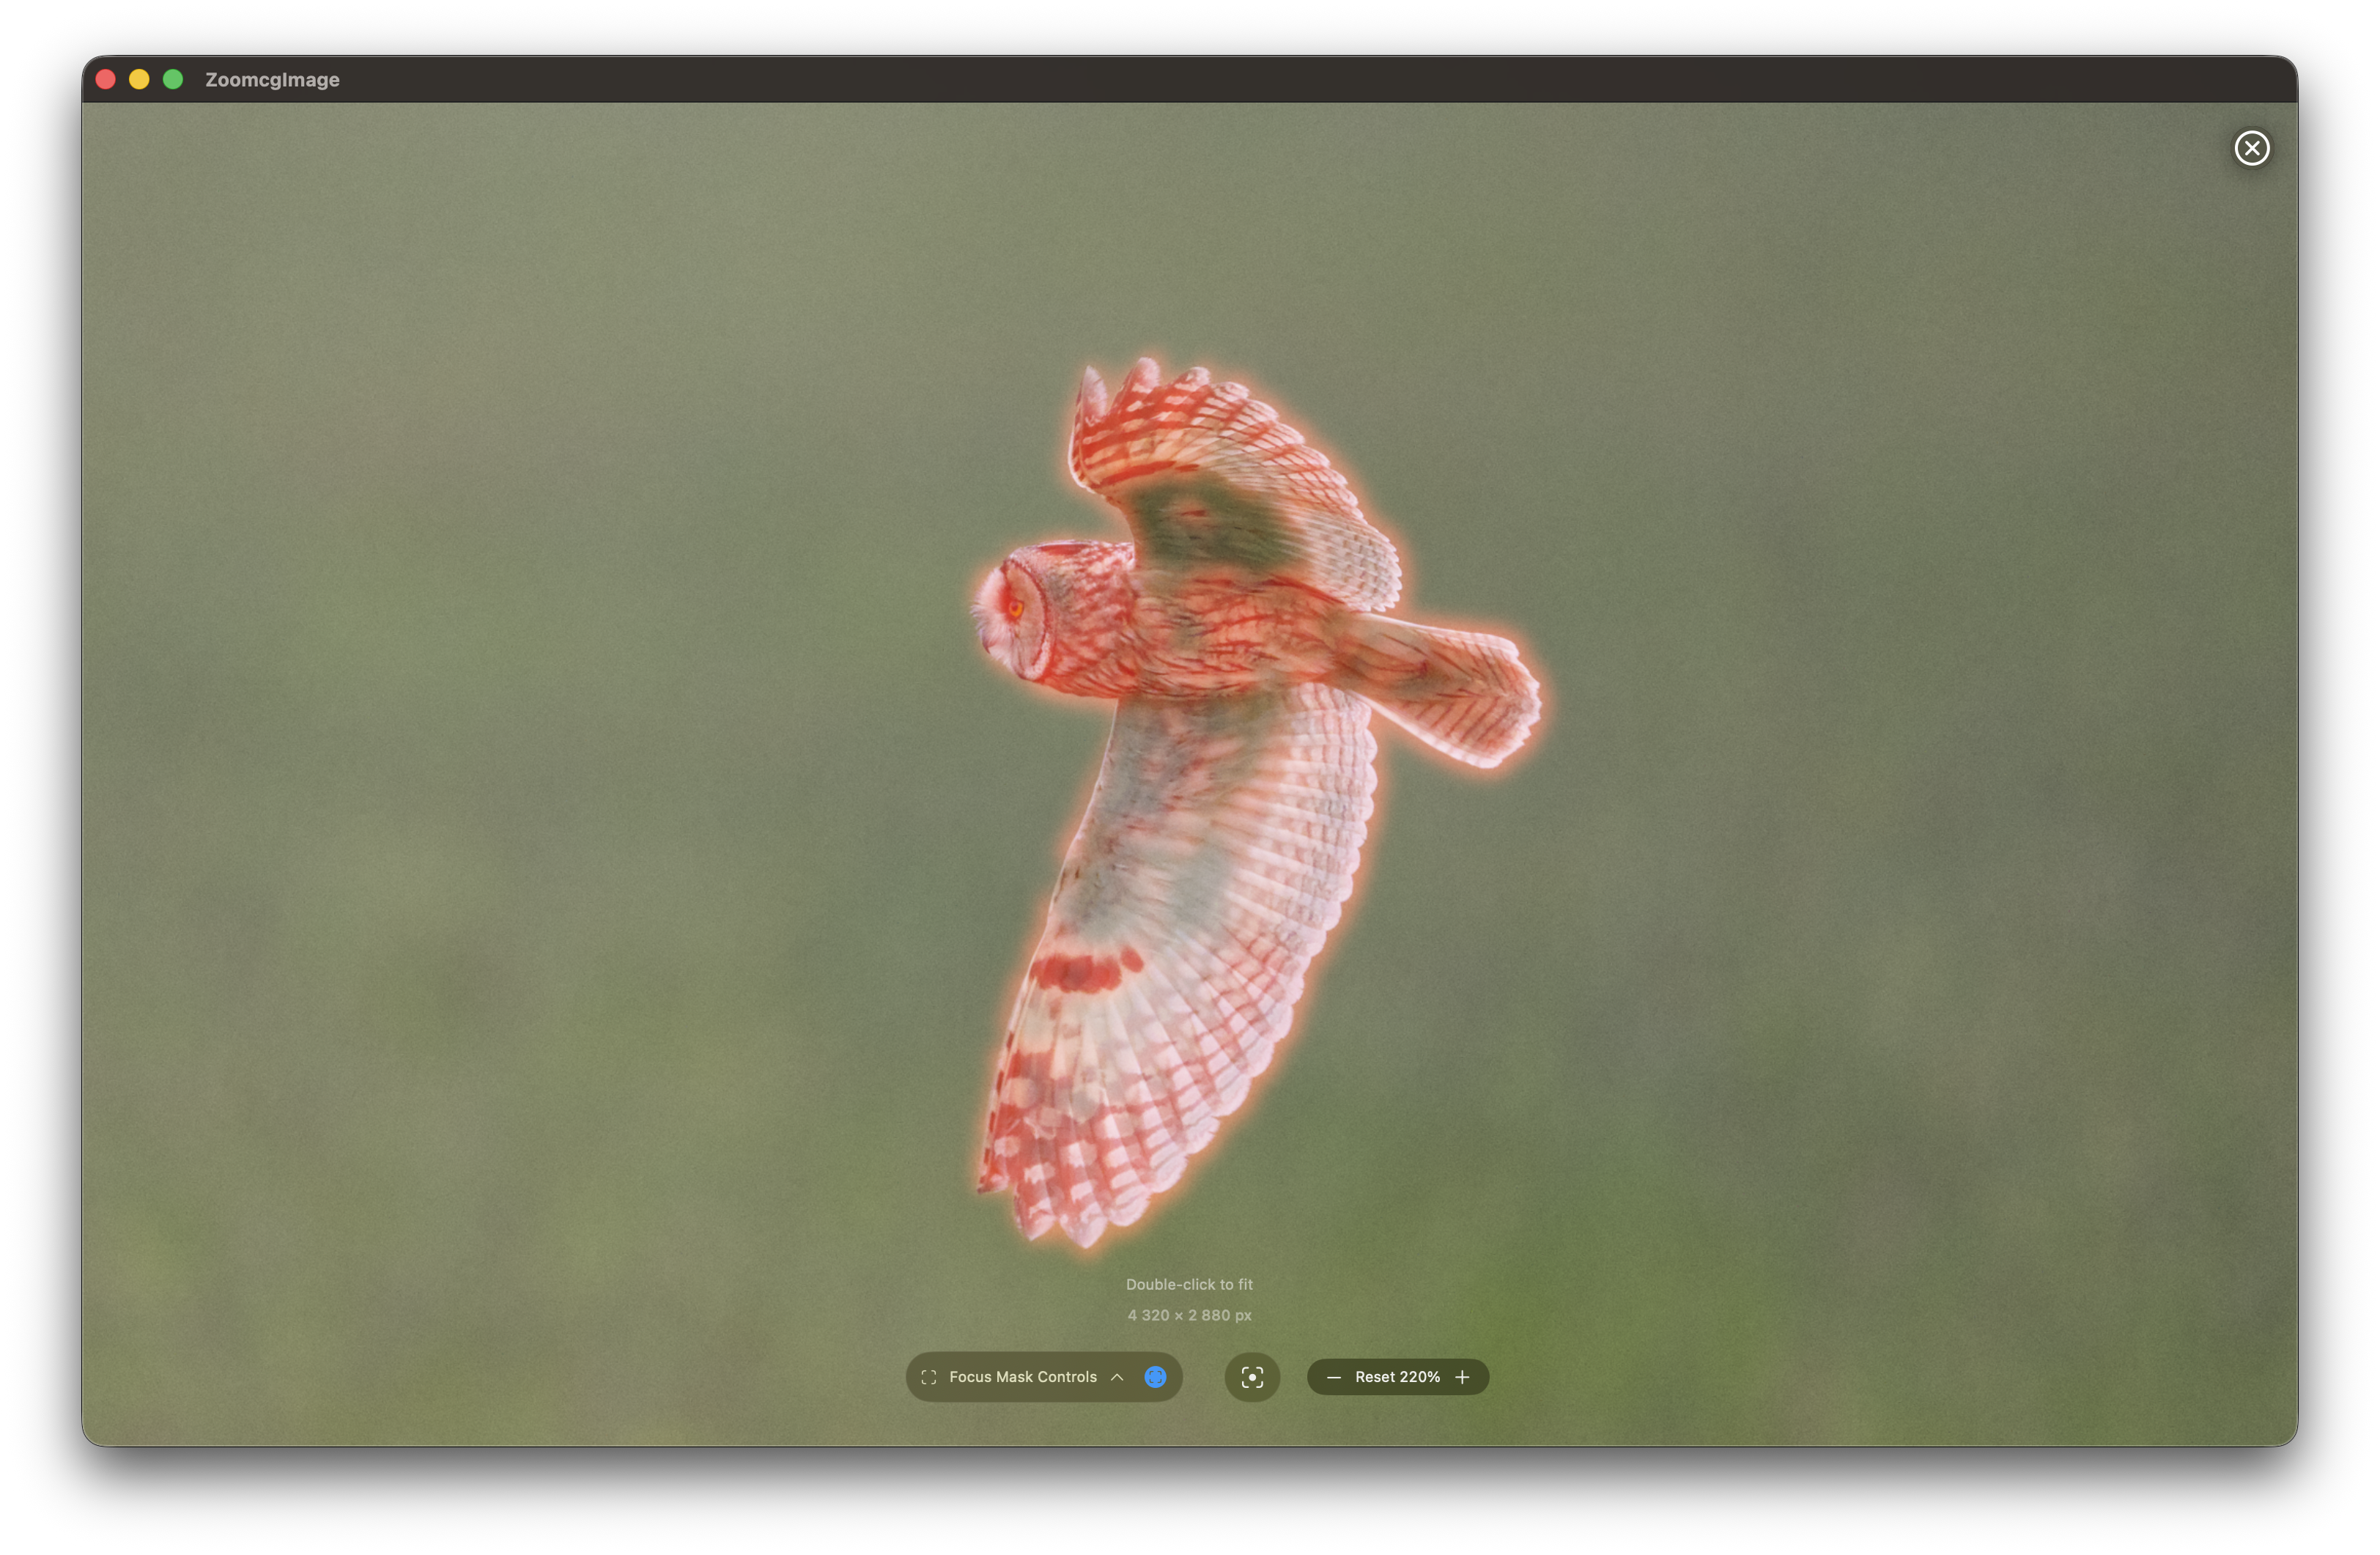
The Focus Mask overlay (toggle in the zoom window controls) renders the same Laplacian edge-detection output that the scorer uses, painted in red over the image. It is a direct visual representation of the score:
- Tight, bright red lines on subject edges → high edge energy → high score.
- Faint, blurred glow → low edge energy → low score.
- Nothing visible on the background → subject isolation is working correctly.
The Focus Mask Controls panel (expand with the chevron next to the toggle) exposes the detection parameters.
Focus Mask Controls
| Control | Effect |
|---|---|
| Pre-blur radius | Gaussian smoothing applied before edge detection — increase for noisy high-ISO files to suppress false edges |
| Threshold | Minimum edge strength included in the mask — higher values show only the sharpest edges |
| Erosion radius | Morphological erosion applied before dilation — removes isolated speckle noise from the mask |
| Dilation radius | Morphological dilation — expands edge regions to fill small gaps and connect nearby edges |
| Laplacian strength | Amplification of the raw edge response — increase to separate sharp and soft frames more aggressively |
| Feather radius | Gaussian softening applied to the final mask edge — visual only, does not affect the score |
| Show raw Laplacian | Displays the unthresholded Laplacian output — useful for diagnosing tuning or calibration issues |
Any change to these controls is picked up by the next scoring run, so you can tune the sensitivity for a particular focal length or subject type and then re-score.
Understanding Low Scores
A low score (red badge) typically means one of the following:
Motion blur — the shutter speed was too slow to freeze the subject. Common with fast-moving birds at the end of a burst. The Focus Mask will show a diffuse halo rather than sharp feather lines.
Missed or soft focus — the autofocus tracked the background, a wing tip, or the wrong subject in a multi-bird frame. The Focus Mask will show strong edges somewhere other than the subject centre.
Small or distant subject — if Vision cannot reliably detect a salient region (subject occupies less than 3 % of the frame), the scorer falls back to the full frame, which dilutes the score with background. Consider cropping the image or using a tighter focal length.
High ISO noise — extreme noise can temporarily boost the score by adding false edges. Increasing the blur radius in Focus Mask Controls before re-scoring reduces this effect.
Tips
- Score after culling for exposure — sharpness scoring works independently of exposure. Culling badly exposed frames first keeps the catalog clean and makes the normalised scale more meaningful.
- Re-score with the aperture filter active — if you only want to compare your telephoto wildlife shots, set the filter to Wide first, then score. The 100 baseline will be the sharpest frame within that aperture range.
- Use the Focus Mask to validate scores — before discarding a yellow or red frame, open the zoom window and enable the Focus Mask. Sometimes a compositionally strong frame has a lower score only because the subject was slightly smaller and the scoring area included soft background. Trust your eye on borderline cases.
- Scores reset when you open a new catalog — each catalog has its own relative scale. A score of 80 in one session says nothing about a score of 80 in a different session.
Feedback
Was this page helpful?
Glad to hear it! Please tell us how we can improve.
Sorry to hear that. Please tell us how we can improve.